Saturday 27 January 2018

gram four pancakes with sauteed veggies, baked tofu and tahini sauce


Hi friends! Happy 2018! (is it too late to still say that? probably.) 

It's been ages since I've posted anything so I thought I'd ease myself back in with something really simple and quick to make. I've been making these pancakes for a few months now and I'm still only about a quarter of the way down the HUGE bag of gram flour I bought.. so they're on the menu every weekend for the foreseeable. They're good though, so no complaints 😍 

You might not find gram flour/black salt in your local supermarket - if not, check out an Asian supermarket (Belfast people: I found mine in Lee Foods). Black salt is not essential however it gives the mixture an 'eggy' taste, kinda like an omelette.. I've never liked eggs but love the taste of black salt in savoury pancakes/tofu scramble 💚 try it!

Also, there's no particular reason for this combination of toppings - just stuff that needed used up in the fridge. These pancakes are amazing with mushrooms, spinach, guacamole, hummus.. pretty much any savoury topping you can think of! 


Ingredients - Tofu

  • 150g firm tofu
  • Dash of sesame oil
  • Splash of soy sauce
  • Pinch of black pepper 
  • Pinch of turmeric

Ingredients - Gram four pancakes

  • ¼ cup gram flour (also called chickpea flour!)
  • 1 tsp coconut oil 
  • ¾ cup water 
  • Pinch turmeric
  • Pinch chilli flakes 
  • Pinch black salt 
  • Pinch black pepper

Ingredients - Tahini sauce

  • 2 tbsps tahini
  • 1 tsp soy sauce
  • 1 tsp sesame oil 
  • 1 tsp apple cider vinegar
  • ½ tsp maple syrup 


Method
Begin by preheating your oven to 200°c. Chop tofu into smallish chunks and sprinkle over remaining ingredients. Mix together until all pieces are coated, place on a baking sheet and set into oven. DONE. This will need around 20 mins to get nice and crispy.

While the tofu is baking, chop up your chosen veggies and begin to cook. I used half a leek and about three handfuls of spinach this time. I sauteed it in a little sesame oil and water. Now put your gram flour and the rest of your pancake ingredients into a blender cup and blend on high for about 20 seconds. The consistency should be what you would aim for with a normal pancake - not too thick/watery. Add in extra water or flour as necessary if you need to adjust. Let the batter sit for a few minutes.


Heat some coconut oil/rapeseed oil in a non-stick pan on medium heat. Use a kitchen towel to spread the oil around the pan. Pour in your pancake mixture - it should need around 5 mins on the first side and about 2/3 when you flip it. While the pancake is cooking, mix all tahini sauce ingredients together with a fork - you may need to use a little hot water to loosen the mixture up. Once mixed, set into the fridge for a few minutes to thicken up. 

Once your pancake is done, plate up with sauteed veggies, baked tofu and a drizzle of tahini sauce 👌 I sprinkled some hemp seeds on top too.. gotta get dem omegas in! ENJOY. 

SHARE:

Wednesday 23 August 2017

failsafe hummus (inspired by The Happy Pear)


I've been meaning to upload this recipe for ages - since I first tried it a couple of months ago.. it's the first hummus (*yummus) recipe I've found that works amazingly every time. FAILSAFE. This is inspired by The Happy Pear's recipe, check them out here - they have loads of awesome, simple vegan recipes on their channel 💚 Also if you get the chance to visit their restaurant in Greystones, Wicklow - do it! I just went at the weekend and I'm already planning my return 🌿

Most recipes I've tried in the past tended to have taste/texture issues - too lemony, too liquidy.. the list goes on! There are a couple of secrets to this recipe's success:

→WHIP IT: Start off with blending the lemon juice and tahini for about a minute until it has a whipped consistency. Doing this will yield a lighter, less dense hummus 👍

→DE-SHELL: This second step isn't necessary, especially if you don't mind a chunkier hummus..but if you're after a smooth, silky consistency -  this is key. I've only actually done this for two batches. Cos I'm lazy 👀

Let me know what you think!

Ingredients:
  • 400g tin of chickpeas, shelled if you want super smooth hummus!
  • 3 tbsp of aquafaba (chickpea juice 😃 lol)
  • 2 tbsp of tahini
  • Juice of 1 lemon
  • 1 clove of garlic, peeled
  • 1 tsp of salt
  • ½ tsp of cumin
  • Sprinkle of cayenne pepper

Method
Add tahini and lemon juice to blender/processor and blend for around a minute - until the consistency is 'whipped'. Add the rest of the ingredients and blend until you reach desired consistency. 

Enjoy - you will be addicted like me! 
SHARE:

Wednesday 15 March 2017

Rainbow Buddha bowl


So although this isn't strictly a recipe, I had to post it.. because SOMANYCOLOURS ♥

I've been having these Buddha bowls constantly lately - they're such a good way to easily get everything you need into one meal. I try to follow a basic guideline for each bowl:

  • Grain - Short brown rice, rice noodles, quinoa, cous cous etc
  • Starchy vegetable - Roasted sweet potato, butternut squash, pumpkin etc
  • Greens - Steamed broccoli, kale, spinach, chard, cabbage etc
  • Protein - Baked tofu, chickpeas, black beans, lentils etc
  • Salad - Chopped cucumber, tomatoes, spring onions (I usually use all three)
  • Fat - Hemp/sunflower/pumpkin/flax seeds, tahini, peanut butter etc

The baked tofu I used here was marinated for around 30 minutes in soy sauce, sriracha and agave nectar. I then sprinkled over some sesame seeds before baking for half an hour. 

Instead of using a sauce I've started squeezing the juice of a full lemon over my food and adding a squeeze of tomato paste - I've become addicted to this combo and it means less salt/sugar - WIN. 

Give these Buddha bowls a try, you'll be amazed at how tasty they are once everything is combined! Enjoy :)


SHARE:

Monday 23 January 2017

Creamy coconut curry with Jerusalem artichokes


Curry is my go-to recipe if: 
  • it's freezing outside ()
  • I have 545121545 veggies needing used ()
  • I'm strapped for time ()
Once you have all of the spices you need in your cupboard, it's really hard to mess up a curry - yay! Stress-free cooking FTW.

I decided to try using Coyo Coconut Yoghurt in this curry in place of the usual tin of coconut milk - I wanted to see if it would turn out creamier - and it did! I also tried Jerusalem artichokes for the first time, they were delicious 😍 


Ingredients
  • 1 tbsp coconut oil
  • 1 large onion, finely chopped
  • 5 Jerusalem artichokes, cubed
  • 3 cloves garlic, grated
  • 1 inch ginger, grated
  • 2 tsp ground coriander
  • 1 tsp garam masala
  • 1 tsp ground cumin
  • 1 tsp chili powder
  • ½ tsp turmeric 
  • 500ml vegetable stock (use more if required)
  • 250g tub of Coyo
  • 3 lime leaves
  • 1 tsp kelp powder (optional, this is a substitute for fish sauce) 
  • 1 tsp soy sauce/tamari
  • 2 peppers, cut into strips
  • 1 head of broccoli, cut into florets
  • ½ lemon, juice of
  • Chopped coriander/spring onions, for serving

Method
Add coconut oil to a large saucepan and turn cooker to medium-high heat. Add onion and Jerusalem artichokes and fry until beginning to soften (about 7/8 minutes). Next add grated garlic and ginger and stir well, let this fry for around a minute. Add all spices and let this fry for a further minute. Next stir in vegetable stock and Coyo and add lime leaves, kelp powder and soy sauce/tamari. Reduce heat to medium-low and leave this to simmer for around 30 minutes - this will allow the flavours of the spices/lime leaves to come through and the sauce will thicken up a little. 

After 30 minutes has passed, add pepper strips to the pan and stir. Cover and let this simmer for 10 minutes. Whilst the peppers are cooking, steam broccoli florets (I prefer to cook them this way, it retains the nice green colour better!). Once ready - stir into curry along with lemon juice. Remove pan from heat.

Served with boiled rice and chopped coriander/spring onions. 

ENJOY 💚
SHARE:

Saturday 14 January 2017

Spicy falafel with guacamol-pea


FALAFEL! why for you so gooooood?!

Falafel is one of those recipes you can chuck anything into and it'll still end up tasting incredible. I had a few bunches of herbs in the fridge that needed used so these went in along with some spicy harissa and ras-el-hanout (left over from my Moroccan soup - check out the recipe here).

On the side we have some guacamole inspired pea-coriander amazyness! This dip was super easy to make and a great use for those frozen peas that have gone to die in the back of your freezer :) 

***Note: When these falafel come off the pan they will be quite soft, sit them aside for a while to cool down and they will firm up.   

Ingredients - Guacamol-pea
  • 300g frozen peas, prepared per pack instructions and blanched in very cold water
  • 10 sprigs coriander
  • 1 clove garlic
  • 2 tbsp tahini
  • 1 spring onion
  • 1 lemon, juice of
  • Pinch of chilli flakes
  • Salt and pepper, to taste
Ingredients - Spicy falafel
  • 1 400g chickpeas
  • ½ small bunch parsley
  • ½ small bunch coriander
  • 1 tbsp harissa
  • 1 tsp ras-el-hanout
  • 1 lemon, zest of
  • ½ lemon, juice of
  • 1 heaped tbsp plain flour 
  • 1tbsp coconut oil

Method
Begin by making the guacamol-pea - chuck all ingredients into a blender and process until smooth. Pour into a bowl and place in the fridge to chill. Now add the coconut oil to a frying pan over high heat. Whilst this is heating, add all remaining ingredients to your food processor and pulse until mixture is somewhere between smooth and chunky - we don't want it to turn into hummus! Wet your hands and form the mixture into small patties - about 1cm thickness, you should get about 10. Place into hot pan and fry for a few minutes on each side, until crisp and golden. 

Serve with guacamol-pea, salad and flatbread ♥

Enjoy!

SHARE:

Wednesday 11 January 2017

Moroccan chickpea soup with wholewheat cous cous


New Year's Resolution Number 1: Start blogging again.

I've been kinda lazy with my Gentle Lentil posts lately - work was super busy so the last thing on my mind in the evenings was blogging, instead I've been getting sucked into 12458621 series marathons (HELLO OITNB, Homeland etc.). I've been lazy with my meals too - beige-y carbs ahoy - but all of that is about to change, I want to start eating fun, colourful food again!

I've been meaning to post this soup for months, I've made it a few times now and it's really delicious - it's also filling enough to have for a main meal. You might find it difficult to track down ras-el-hanout and harissa, I ended up finding mine in a local healthfood shop and Marks & Spencer - either way, these two ingredients are essential!

This recipe serves four.

Hope you enjoy ♥
 
Ingredients
  • 1 large onion, finely chopped
  • 2 carrots, diced into small cubes
  • 5 cloves of garlic, grated
  • 1 inch of ginger, grated 
  • 3 tsp olive oil
  • 2 tbsp ras-el-hanout
  • 2 tbsp harrisa paste
  • 1 tin chopped tomatoes
  • 1 tin chickpeas
  • 80g wholewheat cous cous
  • 800ml vegetable stock
  • ½ a lemon, juiced
  • Chopped coriander, for serving 

Method
Heat 2 tsps of olive oil in a large saucepan, add chopped onion and carrot. Fry this over a medium heat for 5-10 minutes, until softened. Add garlic and ginger and fry for a further minute. Add ras-el-hanout and harissa and stir well - fry for a minute. Finally, stir in the tinned tomatoes, chickpeas and about 700ml of the vegetable stock - we just need to reserve enough to prepare the cous cous with. Turn the heat down to medium-low and simmer for around 20 minutes. 

Whilst the soup is simmering we will prepare the cous cous. Pour dry cous cous into a bowl with 1tsp olive oil. Add 100ml of hot vegetable stock and cover. Allow this to soak for 20minutes and when ready, uncover and fluff with a fork.

After 20 minutes, remove soup from heat and squeeze in the juice of half a lemon. Ladle the soup into bowls and add a large spoonful of cous cous to each. Serve with a good sprinkling of chopped coriander. Enjoy!
SHARE:

Monday 24 October 2016

vegan kimchi


KIMCHIIIII! My newest addiction. Seriously - try it... you'll be addicted too, promise!

Kimchi is a Korean dish consisting of spicy, crunchy veggies and salt. It can be eaten fresh or fermented, BUT fermented is the way forward - that way you can reap the benefits of immunity boosting, gut-loving good bacteria...and it tastes much better too!

Traditional kimchi uses fish sauce to add a umami element to the dish - I replaced this with kelp powder and a little water, however I've heard of people using wakame (seaweed), miso paste and mushrooms - you could try one of these if you can't find kelp powder! I found it easy to locate all of the other ingredients, with the exception of the gochugaru chilli. This is a coursely ground red pepper with a texture in between flakes and powder. The flavour is hot, sweet and slightly smoky - this ingredient is essential for making kimchi - it cannot be replaced with 'normal' chilli flakes/powder. I found mine here on Amazon.

This recipe filled a 1 litre mason jar (you'll need one of these too - a screw top jar will also work)

Ingredients
  • 1 large head of Chinese leaf 
  • ¼ cup of sea salt

  • 1 heaped tbsp of glutinous rice flour
  • ½ cup of water
  • 10 cloves of garlic, grated
  • 1 small onion
  • 2 tbsp ginger, grated
  • 1 tbsp sugar
  • 1 tsp kelp powder, mixed with 3 tbsp water
  • 6 tbsp gochugaru chilli 

  • 4 spring onions, sliced into inch thick pieces
  • 1 carrot, julienned or cut into ribbons

Method
Begin by preparing the cabbage - slice Chinese leaf length-ways into quarters and cut off the cores. Then cut across to make 2 inch bite-sized pieces. 

Next we will salt the cabbage. Find a large bowl - add cabbage and sea salt and begin to massage salt into cabbage pieces. Do this for a few minutes - until cabbage beings to soften, then fill the bowl with water until all pieces are covered. Place a plate with something heavy-ish on top of the cabbage - this will ensure all of the pieces are submerged in saltwater. Leave this to soak for 1.5 hours, turning every 30 minutes to ensure the pieces are evenly salted. 

Whilst cabbage is soaking, prepare kimchi seasoning. Add glutinous rice flour and ½ cup of water to a saucepan over heat, whisking continuously. When the mixture starts to become 'gluey' remove from heat and place in the fridge to cool down. Once cooled, add rice flour paste, garlic, ginger, onion, sugar, kelp powder (and 3 tbsp water) and gochugaru to a food processor. Blend until smooth. 

Once cabbage has soaked for 1.5hours, remove from bowl and rinse with cold water three times. Drain well (squeeze off extra water if necessary!) and place back into bowl. Add carrots and spring onions and pour over kimchi seasoning. Massage seasoning into the vegetables - you may want to wear rubber gloves for this part - until everything is well coated. 

Pack kimchi into mason jar ensuring that it's pressed down so the liquid covers the cabbage, leave about an inch of space at the top. Leave the kimchi to ferment for two days on your countertop - you'll want to open the jar once or twice a day to allow it to breathe - we don't want any kimchi explosions happening. That would be bad. Very bad. Once the two days are up, place your kimchi jar into the fridge - this will slow down the fermentation process. Taste each day to decide when your kimchi has fermented to your taste - I left mine in the fridge for a week, so 9 days fermentation in total. 

Once your kimchi is ready enjoy as a side dish or just straight out of the jar as I did! 


WE ♥ KIMCHI! 


SHARE:

Tuesday 4 October 2016

vegan Greek salad with crispy mini roasties


So it's been the best week ever in the world of vegan cheese (GARY?! yes.) - Sainsbury's released SEVEN new dairy-free cheeses and most of them taste like the real deal. AMAZING TIMES. I highly recommend checking out the caramelised cheddar, Greek, Wensleydale with cranberry and garlic & herb soft style cheeses, you won't regret it.

I finally managed to get my hands on the Greek-style cheese - they are all constantly out of stock, which is amazing..! The first recipe that came to mind was Greek salad - fast, tasty and satisfying - perfect for a Monday eve. I served this with crispy mini roasties and a huge imaginary glass of red wine ♥

Ingredients
  • 500g mini potatoes, washed
  • 3 tbsp olive oil
  • Salt and pepper, to season

  • 4 vine tomatoes, chopped roughly
  • ½ bag of baby plum tomatoes (about 15), halved
  • Salt, to season tomatoes
  • 1 cucumber, chopped roughly
  • ½ a red onion, sliced very finely lengthways
  • ½ pack of black olives (about 10)
  • 200g pack of Sainsbury's Greek-style dairy free cheese, you can find this here

  • 3 tbsp extra virgin olive oil
  • 3 lemon juice
  • 2 tsp dried oregano

Method
Begin by adding mini potatoes to a large pan. Cover with water and bring to a boil - we want to boil these until they are beginning to soften. While the potatoes are boiling, add 3 tbsp of olive oil to a casserole dish, preheat the oven to 220°and place the dish inside. When a knife can easily pierce through one of the potatoes, remove and strain all water off. Add potatoes to preheated casserole dish, season well and toss in the hot oil. Place in oven until crispy, remembering to turn after about 15 minutes. 

While potatoes are roasting, add the chopped vine/baby plum tomatoes to a bowl and sprinkle with salt - set aside. Then stir together extra virgin olive oil, lemon juice and oregano and set aside - this is our salad dressing.

Once potatoes are almost done, combine all salad ingredients in a large bowl and stir carefully. Drizzle over the dressing and serve with crispy mini roasties. ENJOY ♥


SHARE:

Tuesday 27 September 2016

DIY Pot Noodle


'Healthy pot noodles???' you say.. YES. YES YES YES. This is going to be my lunch of choice for Autumn/Winter. It has everything - satisfying carb-y goodness, aromatic flavours and lots of crunchy veggies (+ the potential to change it up in loads of different ways - think Thai green curry paste, miso paste, TOFU.. the list goes on) ♥ These pots can be made in advance and stored in the fridge, when you want to use it simply open and add hot water. 

These pot noodles all take on a similar structure:

Flavour base: I used vegetable stock, sesame oil, hot sauce, liquid aminos, chilli flakes and grated ginger/garlic. I also added some kimchi which tasted amazing! You can totally change this up using things like Thai green curry paste, miso paste, Korean chilli paste etc - the list goes on! Bear in mind that it's best to keep the wet ingredients at the bottom. 

Fillers: As well as using fresh veggies I also used some frozen 'filler' veggies. These help pack out your noodle cup  - I used frozen peas and sweetcorn.

Noodles: Pretty much anything goes here - think ramen, rice noodles, udon etc. I used brown rice noodles. 

Fresh veggies: Again, anything goes so get creative! I used sliced pak choi, enoki mushrooms, shiitake mushrooms, lots of fresh coriander, sliced spring onions and sliced chilli. I also added a good squeeze of lime juice once my noodles were cooked. Keep these fresh ingredients at the top of your cup where they won't get crushed.


Ingredients
Flavour Base:
  • 1 tbsp vegetable bouillon
  • 1 tbsp sesame oil
  • 1 tsp chilli flakes
  • 1 tsp hot sauce
  • 2 tbsp kimchi
  • 2 cloves garlic, grated
  • 1 tsp ginger, grated
Filler Veggies:
  • 3 tbsp frozen peas
  • 3 tbsp frozen sweetcorn
Noodles:
  • 1 portion of brown rice noodles, uncooked
Fresh Veggies:
  • 1 head pak choi, cut into bite-sized pieces
  • Handful of enoki mushrooms, ends cut off
  • Handful of shiitake mushrooms, sliced
  • 2 tbsp fresh coriander, chopped
  • ½ red chilli, sliced finely
  • Squeeze of lime juice, for serving

Method
Pack all ingredients into your mason jar in the order detailed above. Add boiling water and close lid tightly. Leave to cook for five minutes. Once cooked, open jar and give everything a really good stir - we need to ensure that all the flavourings in the bottom of the jar get spread through the soup! Squeeze some fresh lime juice on top. ENJOY. 

SHARE:

Friday 23 September 2016

vegan korean bibimbap


Ever since I made this a few days ago I've had MMMBop stuck in my head. Halp meeeeeey!

Seriously though - bibimbap is awesome. I tried it for the first time on Monday at a little Korean cafe here in Belfast and decided I needed to recreate it immediately.. so this was dinner on Tuesday ♥

You could totally switch up the veggies depending on what needs used in your fridge but you MUST stirfry them separately. This will test your patience. And your arm

The only part of this recipe that may be tricky to source is the Gochujang - this is like a spicy Korean version of miso - and it's essential in bibimbap! I found it in my local Asian supermarket, so if you have one - try there first.

Ingredients - Bowl
  • 1.5 cups of white rice, cooked - you can experiment with sticky/brown rice too!
  • 1 pack of shiitake mushrooms, sliced
  • 2 tbsp soy sauce/liquid aminos/tamari
  • 1 tbsp agave nectar
  • 1 tbsp mirin
  • ½ bag of beansprouts
  • 1 tsp sesame oil
  • Pinch of salt
  • 1 carrot, julienned - I grated mine but chunkier would work much better
  • 1 tsp sesame oil
  • Pinch of salt
  • 2 big handfuls of baby spinach
  • 1 tsp sesame oil
  • Pinch of salt 
  • ½ a cucumber, julienned - again, I grated mine - chunkier would be better
Ingredients - Gochujang chilli sauce
  • 2 tbsp Gochujang paste
  • 2 tsp sesame oil
  • 2 tsp agave nectar
  • 2 tsp soy sauce/liquid aminos/tamari
  • 2 tsp rice vinegar
Ingredients - For serving (optional)
  • Vegan kimchi - I bought this but I'll be making my own soon, stay tuned!
  • Black sesame seeds

Method
Begin by preparing the shiitake mushrooms - all vegetables must be prepared separately. Heat up a pan and add mushroom slices, soy sauce, agave nectar and mirin. Fry these over medium heat until they have absorbed all liquid - about 4-5 minutes. Set these aside.

While the mushrooms are cooking, whisk together all ingredients for the Gochujang chilli sauce. Mix well and set aside. 


Heat 1 tbsp of sesame oil in your pan and add beansprouts. Sprinkle with a little salt and stirfry until cooked but still crunchy - about 5 minutes. Set these aside.

Heat 1 tbsp of sesame oil in your pan and add carrot. Again, sprinkle with a little salt and stirfry until wilted - about 30 seconds - or a little longer if you julienned! Set these aside. 

Heat 1 tbsp of sesame oil in your pan and add spinach. Again, sprinkle with a little salt and stirfry until wilted - about 1-2 minutes. Set this aside. 

To serve, divide rice evenly between two bowls then arrange all of your prepared veggies around it. Add a few spoonfuls of Gochujang chilli sauce and sprinkle with sesame seeds. Serve with kimchi if you have some. Give your bibimbap a REALLY good stir before digging in. Hope you enjoy! 
SHARE:

Thursday 15 September 2016

buddha bowl with orange/sesame/miso dressing


Soooo I *finally* stumbled across some purple sweet potatoes (SO DAMN PRETTY) the other day! I was stuck trying to think of what to use them in.... finally decided on a Buddha bowl - I had loads of baby pak choi that needed using and I've been wanting to try making a miso dressing - FATE ♥

Just like the last bowl, there is no real recipe to follow - just use whatever you have - usually I try to include a variety of grain, some veggies and either tofu or beans of some sort.

The dressing for this is so good. Get excited. 

Here's what I used in my bowl:
  • Purple sweet potatoes, steamed then baked
  • Smoked tofu, sliced and fried in a little sesame oil
  • Rice
  • Baby pak choi, steamed
  • Cucumber, chopped
  • Spring onions, chopped
  • Black sesame seeds
Ingredients - Dressing 
  • Juice of half an orange
  • 2 tsps of sesame oil
  • 2 tsps of rice wine vinegar
  • 2 tsps of white miso paste
  • ½ tsp of fresh ginger, grated

Method
Mix all dressing ingredients well until there are no lumps and set aside. Arrange your Buddha bowl with your chosen ingredients. Top with sesame seeds and spring onions. Drizzle over some miso dressing and ENJOY. 

SHARE:

Wednesday 14 September 2016

15 minute miso soup


This miso soup is sooo so comforting when you're feeling under the weather. I got home from work on Monday and felt awful (non self-inflicted), but after a bowl - or three - of this I felt much better. It cures all ills.. SRSLY


This recipe made four bowls.

Ingredients
  • 4 cups of water
  • 4 cloves of garlic, grated
  • 1 sheet of nori, cut into bite-sized squares
  • 1 cup of tofu, cubed
  • Dash of liquid aminos/soy sauce/tamari
  • 5 stems of baby pak choi (or greens of your choice!)
  • 4 tbsp of white miso
  • 4 spring onions, chopped

Method
Add garlic and nori to a large saucepan, pour in water and bring to the boil. Allow this to simmer for around 10 minutes. Add the cubed tofu, liquid aminos and pak choi and allow to simmer for another 2-3 minutes (you may choose to simmer longer, I just don't like to overcook greens!). Remove saucepan from heat. Take a cupful of broth and pour into a separate bowl, add miso paste and stir well to ensure that all lumps are gone. Pour this broth/miso mixture back into the pan and stir. Serve with sliced spring onions scattered on top. Enjoy - and prepare to be addicted!
SHARE:

Wednesday 7 September 2016

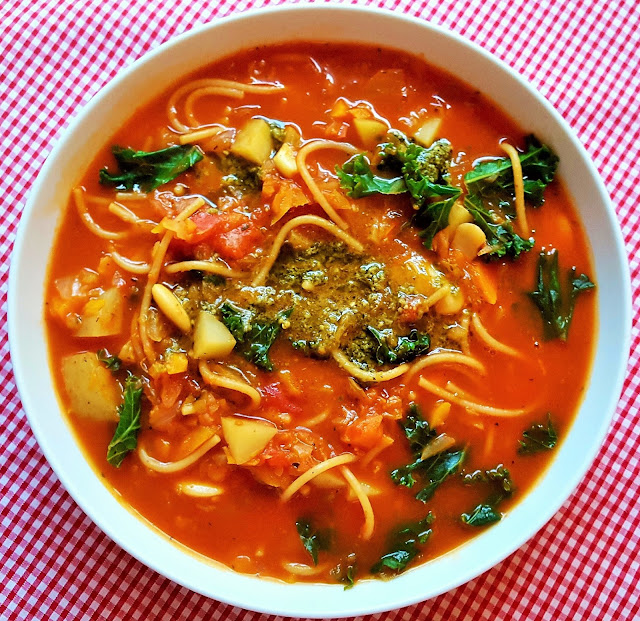
minestrone soup


This soup is really easy and cheap to make, great for Autumn/Winter dinners when you want something warm and filling! Feel free to sub the veggies for whatever needs used in your fridge, you can also sub the beans to another variety (think chickpeas/cannellini beans) and use cabbage/spinach instead of kale ♥ 

I used a food processor to chop up the ingredients - saved SO MUCH TIME.

This recipe will make enough for about 6 - 8 big bowls of soup.

Ingredients
  • 1 tbsp olive oil
  • 1 large onion, finely chopped
  • 5 cloves garlic, grated
  • 5 carrots, finely chopped
  • 5 celery sticks, finely chopped
  • 5 baby potatoes, diced
  • 2 tbsp of dried italian herbs (or ground basil/oregano - whatever you have!)
  • 1 tin chopped tomatoes
  • 5 tbsp tomato puree 
  • 1.5 litres vegetable stock
  • 150g wholewheat spaghetti, broken into halves
  • 1 tin of butter beans
  • Handful of curly kale
  • Salt and pepper, to taste
  • Vegan pesto for serving (optional) 

Method
Heat the olive oil in a large saucepan. Add the onion, carrot and celery and allow to soften for around 5 minutes over medium heat. Add potato and garlic and continue to fry for further five minutes. Stir in the herbs, tomato puree, chopped tomatoes and stock. Stir well and bring to the boil. Once boiling, reduce heat and cover then allow to simmer for half an hour. After half an hour, add spaghetti and broad beans. Allow to simmer for a further 10 minutes. Add kale and allow to simmer for another 2 minutes. Season to your taste. 

Serve with a spoonful of pesto on top. Enjoy! 
SHARE:

Friday 26 August 2016

lemony carrot and potato dahl


Dahl is one of my go-to recipes for that lovely week before payday when I'm in the depths of financial ruin (like now, ha). It costs so little to make - I usually have all the spices and lentils in my cupboard so all I really need to buy is some fresh veggies to bulk it out with!

I wanted my carrots and onions chopped really finely for this recipe, so I used my mini chopper (this thing) - takes sooo much hassle out of cooking! ♥ it. 

Ingredients
  • 1 onion, chopped finely
  • 4 cloves of garlic, grated
  • 1 carrot, chopped finely 
  • 1 baking potato, cut into small cubes
  • 250g of red lentils
  • 2 tsp ground coriander
  • 1 tsp cumin
  • 1 tsp chilli flakes
  • ½ tsp salt
  • 1 ltr vegetable stock
  • Zest of 1 lemon
  • Juice of ½ lemon
  • Fresh coriander, for serving

Method
Add chopped onions and garlic to a pan over medium heat. Fry until onions begin to soften and turn a golden colour. Add carrot and potato and fry for a further two minutes. Add all spices and fry for a minute. Pour in stock, lentils and salt. Let this simmer for around half an hour, until the lentils are soft and mushy. Once the lentils are cooked through, remove pan from heat. Add in zest and lemon juice and serve with lots of fresh coriander on top. ENJOY :) 

P.s - you can make this into a soup if you add a little more stock and whizz up in a blender!
SHARE:

chickpea and spinach curry


Ohhh chickpeas we love you! Up there with lentils as one of the most versatile ingredients EVAR. Use them in curries, falafel, stews and burgers. Oh, and not to forget HUMMUS. The shining jewel in crown of the chickpea ♥ 

I always try to have a few tins of these in the cupboard for days when I just can't be bothered. Chickpea curry is too easy - just fire it all in the pan and stir occasionally basically. Really cheap to make and tasty and satisfying to eat. Win-win. 

*The ingredient list looks huge but it's mostly spices! Once you have these you'll be good for aaages.

This recipe serves 4.

Ingredients
  • 1 onion, finely chopped
  • Thumb sized piece of ginger, grated
  • 4 cloves of garlic, grated
  • 1 green chilli, deseeded and finely chopped
  • 1 tsp mustard seeds
  • 2 tsp coriander
  • 1 tsp cumin
  • 1 tsp fenugreek
  • 1 tsp garam masala
  • ½ tsp chilli flakes
  • ½ tsp chilli powder
  • ½ tsp turmeric
  • Pinch asafoetida
  • 2 tins of chickpeas
  • 1 tbsp vegetable bouillon
  • 1 tin of chopped tomatoes
  • 1 tin of coconut milk
  • Juice of half a lime
  • Handful of spinach
  • Water (if needed)
  • Chopped coriander, for serving

Method

Add mustard seeds to pan and dry fry over high heat for about ten seconds. Reduce heat to medium and add chilli, ginger and onion. Fry until the onions start to soften and turn a nice golden colour. Add garlic and fry for a minute or two. Add the spice mix and fry for two to three minutes. Pour in chickpeas, coconut milk and chopped tomatoes. Then add lime juice and bouillon and stir well. Let this all simmer for about 30 minutes, adding water if the mixture becomes too thick or starts to stick. If there are any big chunks of tomato remaining, mash them a little. Taste curry and season as necessary. Right before serving add a big handful of spinach and stir well.

Top with chopped coriander and serve with your choice of rice/naan/roti. Enjoy!


SHARE:

Wednesday 24 August 2016

easy vegan pizza


I've been craving pizza for DAYS ON END but I'm trying to save for an upcoming trip so struggle to justify the £15+ it costs to have one delivered! This DIY version definitely hit the spot, my best attempt yet - it's super easy to make and costs next to nothing once you have the basic ingredients in the cupboard.

I used plain flour in this recipe but next time I think I'll experiment with half plain, half wholewheat to make it a bit healthier. Usually I forego cheese and use a combo of nutritional yeast and olive oil but I had some Violife Pizza Cheese in the fridge, it melted amazingly and tasted great :) 

Ingredients - Dough
  • 350g plain flour + extra for dusting
  • 1 tsp yeast
  • 1 tsp salt
  • 1 tbsp olive oil
  • 200ml warm water
Ingredients - Sauce
  • ½ a punnet of cherry tomatoes (I counted - I used 18)
  • 4 tbsp olive oil
  • 2 tbsp tomato puree
  • 2 cloves of garlic
  • 1 tsp oregano
Ingredients - Toppings (use your choice!)
  • Violife pizza cheese, grated
  • Chestnut mushrooms, sliced
  • Green olives, sliced
  • Sweetcorn
  • Cherry tomatoes, sliced
  • Rocket, (add after cooking)

Method
Begin by preparing the sauce. Add all ingredients to a blender and blend until smooth with no lumps. Set aside in the fridge. 

Sieve flour into a large bowl, add yeast and salt and stir. Make a well in the centre and pour in the oil and water. Begin to stir in the flour and continue until everything is mixed well. Scatter some flour on your counter and begin to knead the dough - if it's too sticky, add more flour. Knead for about 5 minutes until the dough is smooth. Now you can either leave the dough to rise for 1-2 hours (I did - I had something else to do before dinner!) in a covered bowl or continue (only if you want thin crust). 

If you've left the dough to rise, give it a quick knead then split into two balls. Sprinkle some flour on your counter and roll out the dough into two large rounds - try to get it as thin as possible as it will rise in the oven! Lift each round onto a silicon mat. Preheat the oven to 220°. Place two upturned baking sheets in the oven to heat up - we will place our pizzas on top of these, this will ensure the bottom of the dough gets cooked properly. 

Smooth a few spoonfuls of sauce over each base then add cheese. Scatter your toppings and a drizzle of olive oil on then place the silicon mats on top of the preheated baking sheets. Bake for 10-12 minutes until crisp. Scatter some rocket on top and enjoy :) 


SHARE:

Thursday 18 August 2016

warm salad of broad bean, courgette and walnut


This dish was inspired by a recipe I came across on the BBC Good Food page and the fact that I had 145845212584 courgettes waiting to be used. It turned out SO tasty - walnut is such a nice addition to  a salad! 

I served this salad with my fail safe baby roasties (recipe coming up soon!) and purple sprouting broccoli, however I think it would go well with most sides - perhaps some homemade garlic bread? YUM.

This recipe yielded 2 portions.

Ingredients - Salad:
  • 1 large courgette, sliced
  • 1 tbsp extra virgin olive oil
  • 1 pack of fresh, podded broad beans
  • A handful of walnuts, chopped roughly
  • Chopped parsley to serve
Ingredients - Dressing:
  • 4 tbsp extra virgin olive oil
  • 1 tbsp lemon juice
  • 1 tbsp white wine vinegar
  • 1 clove of garlic, grated
  • Salt and pepper to taste

Method

Begin by putting your broad beans on to steam for about 5-6 minutes (or per pack instructions). Whilst the beans are steaming, heat a tbsp of olive oil in a frying pan over medium heat then add courgette slices. Fry courgette until it softens, and begins to turn a nice golden colour. In the meantime, add all dressing ingredients to a bowl and stir well.

Once broad beans and courgette are cooked, add to a bowl along with chopped walnuts. Mix well, top with chopped parsley and dressing. Serve with your choice of side. Enjoy!
SHARE:
© the gentle lentil. All rights reserved.
Blogger Templates by pipdig